Wednesday, April 24, 2013

Frost Protection for Early Planting

First we wait for a break in the weather; then, we wait for the earliest we can start seeds indoors; next as soon as we have beds ready for planting we can't wait to get those seedlings safely planted out in the garden.......... during spring, in spite of all else we are doing, we are eagerly awaitng that day when we can get our seeds and seedlings planted.  My tomato seedlings are in 3 inch cups and quickly outgrowing them, both they and I want them to get transplanted outdoors.  So I have constructed a simple cover to protect the tender plants from any late frost.


 Using 1" x 10' pvc tubing bends easily to fit inside the raised bed frame.


PVC tubing set into raised bed frame and pushed down into the soil as deep as possible.

Set one 1" x 10' pvc tube on top of "hoops" and fasten with wire.

Measure 1' intervals on each of 4 sides of raised bed.


I placed cedar shims at each of the markings; this is how the bed will
be divided into 40 SF plant areas.

The next step will be to cover the hoops with either plastic sheet.


Garden Tool Care - UPDATE 05/23/2013

Since many of us aren't quite ready to be working in the garden, I thought this may be the time to talk about keeping our tools in "good as new" condition.

I believe it is safe to say that each of us has a least one person in the household who just doesn't manage to get the tools cleaned and safely stowed from one season to the next, let alone honed.  I was reminded of this when I attempted to push a spade into the one of the raised beds to remove the sod.  It couldn't cut through a single blade of grass, as hard as I tried,  that spade would not dig into the sod.  It is not surprising however since it's edge has never been sharpened.

Now left with two options, purchase a new spade for myself, or sharpen the one we already have.   Since I am not one to buy anything to replace something readily available it made more sense to purchase a rasp.

Sharpening a spade is a simple chore.  A few minutes with a rasp restores the "good as new" to the spade's edge.  Begin by cleaning the spade.  A quick brushing will remove any left over soil clinging to the metal, then, using a medium rasp (file), slide the file in one movement, from one end of the spades edge to the other and also away from the edge.  Repeat this a few times on both the front and back sides of the spade.
Give the spade a quick wipe-down and it is ready to for work.

All your gardening tools should be cleaned and dried well at the end of the season and stored in a safe, dry place.


s
 

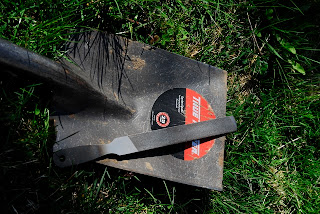
This rasp is light weight and easy to use.


Glide the rasp along the edge of the spade from one end to the other and away from you at the same time.


My favorite gardening tool is without doubt the garden weasel.  I love this tool.  It cultivates to loosen the soil or to remove weeds. Flip it over and use it to push and pull soil as with a hoe.  Keeping it clean with a quick hosing down after each use will extend the life of your weasel.
Garden Weasel
 

Rinse after each use and allow to air dry.
 
My weasel is several years old and still looks and works like new.  With care all your tools will continue to look and function like new and will save $$$ over the years.


Next is my garden fork, it's great for removing things like straw and hay from the chicken run, or for breaking up soil, etc. 
When/if tiny rust spots appear sand them off immediately and touch up the area with a thin rubbing on of oil.    


.

Thursday, April 11, 2013

Free Compost! UPDATE!

Free Compost!

That's right. Free compost.

I love walking in the woods.  I had always noticed the rich soil beneath the layer of dried leaves.  The
rich, brown soil was nature made compost.  These days whenever I drive through the countryside I take notice of the wooded areas.  Avoiding piney woods as that compost may be too acid for my vegetable garden.  I look for lots of maple and oak trees where there is a good cover of dried leaves. 
Keeping a few containers in the back of my car, and a shovel, makes it handy for those drives during
which I see an area that looks just right.  As much as possible stay off private property.  There is usually plenty of compost in that area along the side of the roads.  I seriously doubt anyone would complain about you taking a bucket of compost from the woods.

Since it takes so long to create your own compost, this method gives your compost bins a boost when
starting out.

I found a place with beautiful composted material about a foot deep, maybe a bit more and will be returning there on Saturday with my shovel and 5-gallon buckets. 

Expect an update on the collection this weekend.


Thanks for stopping by.

UPDATE:

We dug up lots of beautiful compost last weekend, enough to get a good start in the garden.  Since we don't own a truck we put extra-large totes in the back of our suv.